Here’s a gallery of photos of some of the dishes we were served at lunches and dinners during my 16-day China Garden Tour from Shanghai to Beijing calling at Suzhou, Guilin, Xian and Luoyang.
There’s a lot more to oats in baking than
flapjacks. They can lend body, texture and a subtle flavour to cakes and
biscuits, a pleasing robustness to a tin loaf or a crunch to crumble topping.
There’s no need to shell out for the good oats, either. In fact, the cheaper the
oat, the better your results will be. Fat, steel-cut rolled oats, jumbo oats,
organic Scottish porridge oats – each of these will take too long to hydrate in
doughs and batters, leaving the finished thing oddly chewy, bitty and dry. Stick
with the bog-standard oats that are part broken and dusty in their packet.
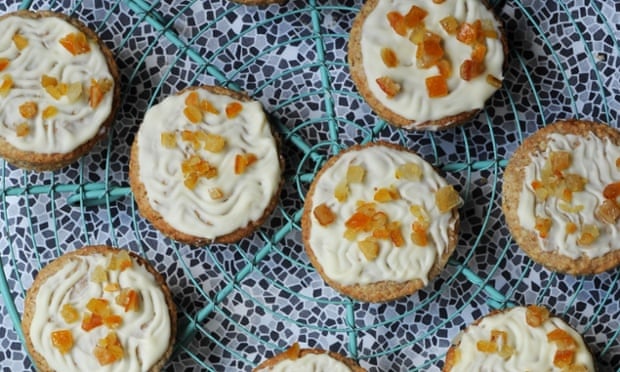
White chocolate honey
oat biscuits
These are much like
Hobnobs – oaty, rubbly and butter-rich, though here daubed with white chocolate
to pair with the honeyed sweetness of the biscuit. You can swap in dark
chocolate if you’ve less of a sweet tooth, or forgo the chocolate altogether if
you’re a purist in these things.
The key to a crisp
finish is in the bake: too long and they’ll quickly brown and become bitter,
cook for too short a time and they’ll quickly soften and crumble. Bake in
batches if you’re not sure about how well heat circulates in your oven, and swap
shelves mid-bake if necessary.
The key to a crisp
finish is in the bake: too long and they’ll quickly brown and become bitter,
cook for too short a time and they’ll quickly soften and crumble. Photograph:
Jill Mead for the Guardian
Makes around
30 100g plain flour 100g wholemeal
flour 75g caster sugar 1 tsp baking
powder A pinch of salt 150g unsalted
butter, firm but not chilled 150g porridge
oats 4 tbsp honey 1-2 tbsp
milk 250g white chocolate 25g candied
ginger or orange peel, finely chopped (optional)
1
Preheat the oven to 180C/350F/gas mark 4. Line a couple of large baking trays
with baking parchment.
2
Combine the plain and wholemeal flours, caster sugar, baking powder and salt in
a large bowl. Cube the butter and add to the bowl then use your fingertips to
rub it into the dry ingredients, working quickly but lightly until there are no
chunks of butter left and the mixture is sandy. Stir in the oats.
3
Whisk the honey with 1 tbsp milk then pour into the dry ingredients. Use a small
knife to “cut” the liquid into the mix, working until no dry flour remains and
the dough is beginning to clump.
4
Gather the dough together, pressing into a flattish disc. Roll out on a lightly
floured work surface until it’s 5mm thick. If the dough’s too sticky to roll,
wrap it in clingfilm and refrigerate for 20-30 minutes before continuing; if
it’s too dry to hold together, add the remaining milk. These biscuits are
supposed to be rubbly and crumbly, so it’s important not to overwork the dough,
a couple of light kneads under the heel of your palm can help to give it the
strength to hold its shape during rolling and baking.
5 Use
a 6cm round pastry cutter to stamp out the biscuits, then arrange these on the
prepared baking trays. Gather up any offcuts, re-roll and cut out the
extras.
6
Bake for 12-13 minutes in batches, rotating the shelves halfway through if
you’re not using a fan oven. They’re done when the edges are just on the cusp of
browning. Leave to cool before moving the biscuits.
7
Once the biscuits are ready, melt the white chocolate in a heavy bowl propped
over a pan of simmering water. Use a silicone pastry brush to spread the top of
each biscuit liberally with the melted chocolate. Decorate with finely chopped
candied ginger or orange peel while the chocolate’s still wet. Alternatively,
just run a fork gently through the chocolate as it sets to mark a wiggly pattern
in it. Leave to cool before storing in an airtight container.
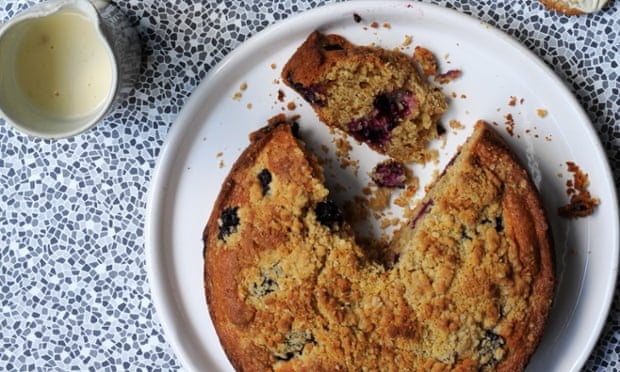
Blackberry oat
crumble cake
There’s a double dose
of oats in this comfort cake: in the batter, creating a nutty, tender crumb, and
in a buttery crumble on top. It’s very autumnal in feel – blackberries,
cinnamon, toffee-ish brown sugar and hearty oats – but I can’t see any reason
why it can’t be enjoyed now, too, on cooler days when spring slips back into
drizzle and dreariness. It’s the kind of cake to be eaten still warm from the
oven, with custard, from under a duvet.
Ruby
Tandoh's blackberry oat crumble cake: There’s a double dose of oats in this
comfort cake... and it's really good with custard. Photograph: Jill
Mead/Guardian
Serves
8 150g unsalted butter, softened 125g soft light
brown sugar 3 large eggs 50g porridge
oats 125g plain flour 2 tsp baking
powder ½ tsp cinnamon ¼ tsp
salt 150g-200g blackberries, halved
For
the crumble topping 50g plain flour 50g porridge
oats 50g soft light brown sugar 50g
unsalted butter, softened
1
Preheat the oven to 180C/350F/gas mark 4. Grease a 20cm round springform cake
tin and line the base with baking parchment.
2
Beat the butter and sugar together in a large bowl for 3-5 minutes, working the
mixture until very light and creamy. If you slack now, you’ll find the mixture
will really clump and curdle when you come to add the eggs. Whisk the eggs, one
at a time, into the butter and sugar, followed by the oats. In a separate bowl,
stir the flour, baking powder, cinnamon and salt together, then add this to the
wet ingredients. Fold lightly together then mix in the blackberries, taking care
not to squash the fruit as you go.
3 For
the crumble topping, combine the flour, oats and sugar in a bowl then add the
butter in small pieces. Rub the butter into the dry ingredients using your
fingertips. Don’t worry if the mixture feels a little sticky or greasy. With a
high proportion of butter in the mix, the crumble should quickly come together
in small clumps.
4
Spoon the batter into the prepared cake tin and level with a spatula. Sprinkle
the crumble all over the top, then place in the oven. Bake for 30-40 minutes, or
as long as it takes for the cake to rise, brown and set through. Leave to cool
completely before serving. Works particularly well with custard.
The least celebrated
of the classic fast food side orders, an optional extra where chips are the
mandatory pairing, onion rings rarely get the love they deserve. This may be
because they are so often done badly, with greasy, flabby batter that releases
its filling in one soggy chunk, or it may be because, in this country at least,
45 years since Listerine appeared on our shelves, we remain slightly suspicious
of the onion and its alliaceous ilk.
For all our
traditional diffidence for oral hygiene, we still don’t have many dishes which
make onion the star, rather than the seasoning, because, like garlic, its
pungency puts it in the same (rather unfair) category as the kebab; what might
be described by the modish as “dirty food” – the kind of thing that is “so bad
it’s good”. Well, I’d like to stand up for the onion ring. A cousin of the much
more respectable Indian bhaji, Japanese tempura and Italian fritto misto, it
seems that the onion ring as we know it today first pops up in print in Fannie
Farmer’s 1906 Boston School Cook Book, and was popularised by fast food joints
and diners, until, together with french fries, it became “American men’s
favourite vegetable”.
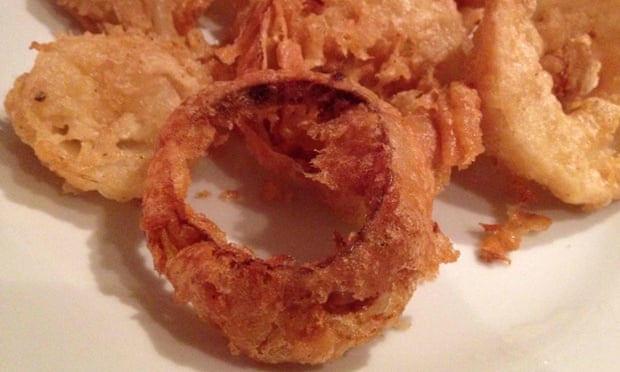
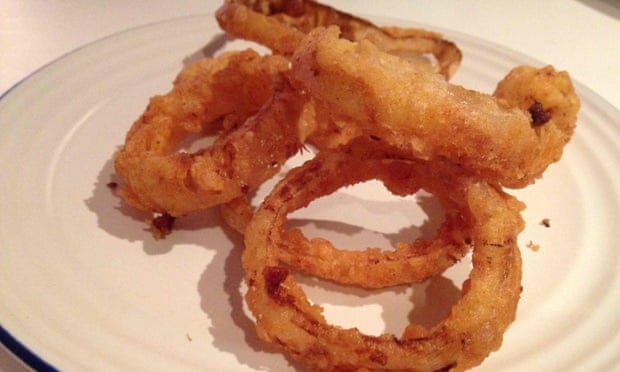
The onions
Martha Stewart’s onion rings.Photograph: Felicity Cloake for the Guardian
As befits our somewhat
sceptical attitude to onions in this country, there isn’t much choice in most
supermarkets; there’s the yellow sort, or the red sort. And that’s it. Many
American recipes, by contrast, specify not only the colour but the variety of
onion, with Diners, Drive-Ins and Dives phenomenon Guy Fieri proclaiming the
“sweeter the better” and Martha Stewart and food podcaster Brenda Anderson both
opting for the super-sweet yellow vidalia, which hails from the city of the same
name in Georgia (pub quiz fact: onions are Georgia’s official state
vegetable).
How to make the
perfect hamburger
I’m unable to find any
in this country, so I try substituting a red onion in Stewart’s recipe. The
results aren’t bad, but the higher sugar content makes it more prone to burning,
and I find it a little too sweet – I’d prefer my onion rings to be emphatically
savoury.
Opinion about the best
width varies from Saveur magazine’s inch-thick (2.5cm) slices to blogger Ree
Drummond’s paper-thin slivers: “Notice that you can see the knife through the
onion slice,” she explains. “That means it’s thin enough.” Drummond’s are
deliciously crisp, but the onion gets slightly lost in the crunchy coating,
while the monster versions are still a little too firm by the time the batter is
done. About 0.5cm works for me, but you may wish to go up to 1cm if you prefer a
more substantial onion ring.
To soak or not to
soak
Saveur’s onion rings.Photograph: Felicity Cloake for the Guardian
Unlike Anderson or BBC
Good Food, Stewart, Fieri, Saveur and Drummond all soak their onions before
cooking – Stewart, Saveur and Anderson in water for between 10 and 30 minutes,
Fieri and Drummond in buttermilk for half an hour and an hour respectively.
This, I imagine, is less to do with softening them than mellowing any harshness
of flavour, which is a good insurance policy when you’re cooking them so
briefly.
I prefer the
buttermilk, not only because it provides a stickier surface for the coating
later on in the process, but because of its tangy flavour. The stuff widely
available in this country is pretty thick, though, and can lead to claggy
batter, so I’m going to thin it down with a little milk.
The
coating
Guy Fieri’s onion rings.Photograph: Felicity Cloake for the Guardian
Onion rings fall into
two broad groups – the battered variety, with a voluminous, brittle shell, and
the less impressive, but crunchier, floured kind. There’s also a breadcrumbed
splinter group of this latter, of which more later.
Good Food, Stewart,
Fieri, Anderson and Saveur all favour the first approach, adding air to their
batter with baking powder, sparkling water, beer – Fieri’s and Good Food’s
billow particularly satisfyingly. Anderson does a double-dip thing, almost as if
she’s coating a scotch egg, dipping the rings in seasoned flour, beaten egg and
then, somewhat mysteriously, beer (whereupon a lot of the flour and egg falls
off). They turn out a lot better than I’d anticipated, but the batter is too
thick for my taste.
In fact, great as they
all look, I prefer the texture of Drummond’s version; the simple flour coating
clings resolutely to the onion. In the batter varieties, the onion seems to have
steamed within its shell, rather than fried in the oil, so it pulls away in one
piece in the mouth with a kind of gummy softness, and the batter itself is so
big and crunchy the filling almost seems besides the point. Drummond’s shards of
crisp onion may not look as fancy, but they suit me much better. (Should you be
of a different mind, I’d recommend the Fieri or Saveur recipes as particularly
good examples of battered onion rings.)
Plain flour, then, is
all that’s strictly necessary, but though the cornflour used by Stewart and
Saveur doesn’t seem to change the texture significantly, I do like the cornmeal
the latter adds as well, which gives the coating a slight grittiness that
emphasises its crispness.
Breadcrumbs prove
almost impossible to stick to slices of onion, especially using beaten egg
white, as a second BBC Good Food recipe suggests – they cling on in isolated
patches, which looks less than pretty. They’re also quite dry, although that may
be more to do with the cooking method.
Seasonings
Brenda Anderson’s onion rings.Photograph: Felicity Cloake for the Guardian
Fieri and Anderson
season their flour with garlic powder, Drummond uses cayenne pepper, Saveur
dried parsley and Good Food’s second recipe cajun seasoning. Garlic powder just
seems wrong on an onion ring (in fact, it seems wrong in most contexts, though
I’m prepared to be proved wrong if anyone can think of a good use for it) and
dried parsley and cajun seasoning don’t really float my boat.
Cayenne pepper,
however, adds a welcome touch of spice – not enough heat to blow your head off,
but just enough to keep you going back for more. I used smoked paprika, which I
like even better and works well with fried foods, but any chilli powder should
work just fine.
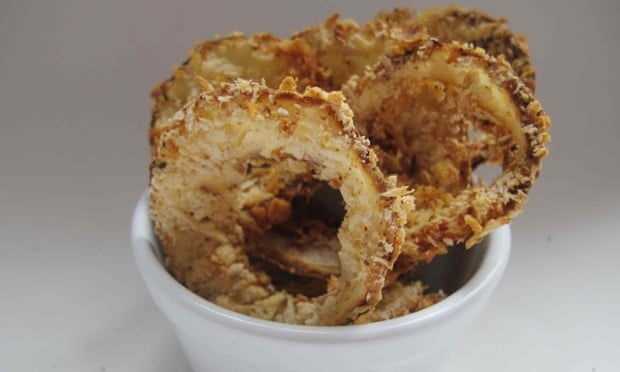
The
cooking
BBC Good Food’s baked onion rings.Photograph: Felicity Cloake for the Guardian
There is little
argument about how to cook onion rings: they should be deep-fried in a neutral
oil at about 180C/350F until golden brown. Baking them, as the second Good Food
recipe suggests, is a false calorie economy; while not quite inedible, they are
very dry – fine if you’re going to dunk them in ketchup anyway, but hardly worth
the bother otherwise.
Frankly, if you’re
watching your fat intake, onion rings probably aren’t the treat for you. If not,
trust me; these are a million times better than most British fast food versions.
Consume in moderation, obviously.
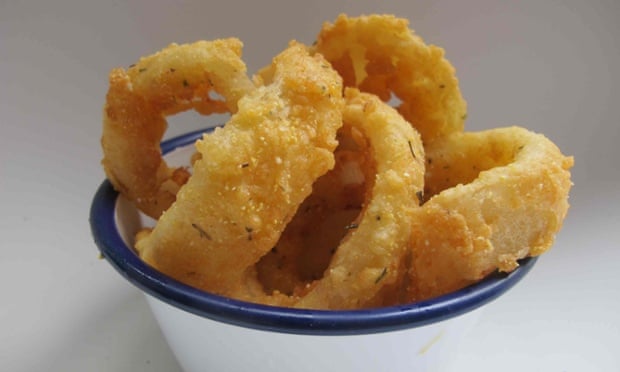
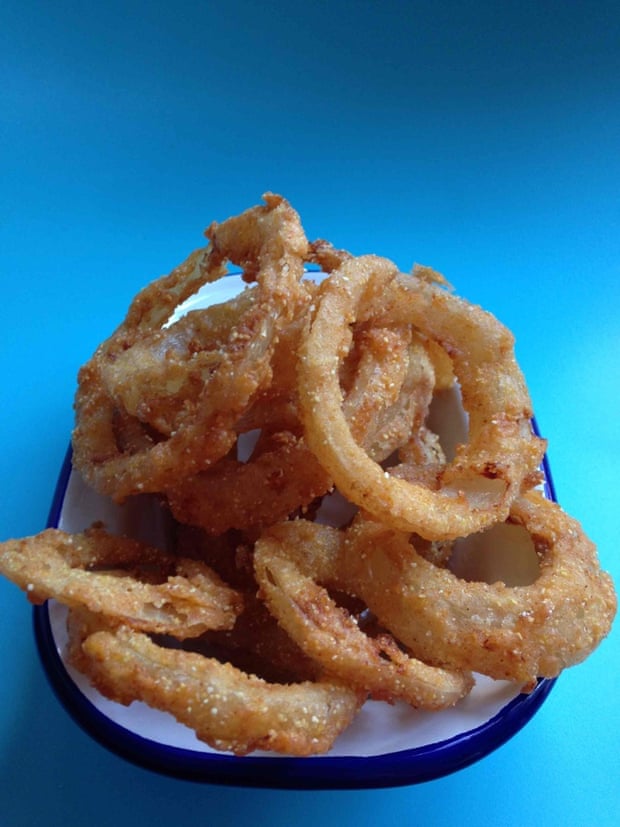
The perfect onion
rings
Perfect onion rings.Photograph: Felicity Cloake for the Guardian
(Serves
4)
1 large
onion
400ml
buttermilk
100ml
milk
Neutral oil,
to cook
75g
flour
25g
cornmeal
½ tsp
salt
½ tsp smoked
paprika
Cut the onion into
rings 0.5-1cm wide, depending on your preference, and put in a small bowl. Whisk
together the buttermilk and milk and pour over the onion, then leave to soak for
at least 30 minutes.
Put the oven on low.
Fill a large saucepan a third full of oil and heat up to 180C/350F. Meanwhile,
put the flour, cornmeal, salt and paprika in a shallow bowl. Pick the onion
rings, a few at a time, out of the buttermilk, shaking off any excess, and toss
in the flour to coat, shaking off any extra flour as you lift them out on to a
plate. Repeat until they’re all well coated. Line a large heatproof plate with
kitchen paper.
Once the oil has come
to temperature, add a handful of rings (don’t overcrowd the pan or they won’t
crisp up properly) and fry for a couple of minutes, turning once, until a deep
golden on both sides.
Lift them out with a
slotted spoon and put on the paper-lined plate. Put this into the oven to keep
warm while you repeat with the rest of the rings, allowing the oil to come back
up to temperature between each batch. Eat immediately, while they’re hot and
crisp.
Onion rings:
criminally underrated or a waste of good soup ingredients? Do you like them big
and battery or thin and crunchy – and does anyone actually like them squashed on
top of a burger?
It is possible to dry potatoes with the benefit of a dehydrator however the process takes considerable effort and generally does not come out as well. Still if that is your only recourse by all means take advantage of it. Dehydrating your potatoes in times of plenty can result in an economical method of stretching your food dollar while still providing variety in your diet.
Up to this point the procedures are the same whether you are using a dehydrator or the oven. If using the dehydrator place the potatoes carefully on the trays and put them into your machine. The final signs that your dehydrated potatoes are completed are that they become brittle and have a slight translucent appearance to them. Allow your potatoes to cool and place them in a jar or vacuum sealed bag.
This is not a pleasant task but a sensible one. if it is sharp and high, the fat is frying or crying out that it is hot enough. This is the moment at which to put into it whatever is to be fried. This removes the starch that makes them slick together. Soaking the cut potatoes in salty water helps make the chips extra crispy. Pat dry in a tea towel.
Lard, groundnut and sunflower oil are highly suitable, cheaper, widely available and provided they are kept free of impurities, won't radically affect the flavor of the food. With these treats you can help your customers make the healthy choices they want to make, while keeping your cash register ringing this holiday season!